Part Two of:
"The Grand Erection"
or
"How We Built a Steel Building in the Back Yard"
We've rested for a week and are now ready to finish the erecting the building hoops. The volunteer crew has returned with much less enthusiasm than the previous weekend, but nonetheless, we persevere...
 |
The morning sun comes through the fiberglass skylights recently installed in the building. Two steel panels were removed and the fiberglass inserted in their place. They do a great job of lighting the inside of the building. |
 |
Another hoop ready for installation. |
 |
Here's a shot of the hoop going up and Cody ready to catch it and set it into place. |
 |
Each hoop was bolted onto the "C" channel on one side as a pivot point before raising to help alignment. |
 |
The last hoop going up! |
 |
Here's a good shot of some of the zillions of bolts that hold the building together. |
 |
Bob and Gary on the scaffolding putting the bolts and nuts through the holes. |
 |
Another view of the last hoop... |
 |
Still bolting the hoop together. |
 |
Judy, (in the background) Ken, Thomas and Brent, relaxing in the glow of a mostly complete building. |
 |
The complete hoop structure. Now we have to go through and tighten up every single nut and bolt, as they were assembled finger-tight to allow for adjustment. Then, the back needs to be assembled and attached, the turbo-vents installed and then we have to begin fabrication and construction of the front doors. There will be two large doors that we will install on a welded togther frame constructed on the front of the building. More to come..... |
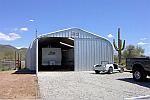 |
Here it is, nearly 1 year later that the front and back are complete! |
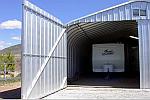 |
Both trailers fit nicely inside the barn |
 |
DONE!! |
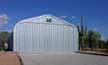 |
Finished! |
Some Design Notes:
If you decide to build one of these, Here's a few things we discovered:
1. Make sure that your concrete
is level! Even a 1/8 inch hump will cause lots of problems with bolt hole
alignment.
2. It is much easier to install the anchor bolts on the base "C"
channel and then place the whole assembly into the wet concrete of the stem
walls, than it is to try to accurately place your anchor bolts (so they line
up with the many holes in the "C" channel ) in the wet concrete.
3. There is NO WAY a 30 by 50 foot bulding can be assembled in one day.
4. A cherry picker would be a great addition to the assembly of this building.
The scaffolding worked okay, but we had to get down and move it 3 times for
every hoop. It would have been nice to have had two people in a cherry picker
that could have driven back and forth along the hoop to install the bolts.
5. You need to order 8-point sockets for the square nuts from Matco tools.
Regular sockets will not work on the square interior nuts and there are over
4000 of them to be tightened - using an open-end wrench would really suck.
Get a couple of socket-to-drill adapters and have a bunch of cordless drills
and batteries ready.